Use this tab to print checks and reports.
![]() Note
Note
Check processing allows multiple check runs to be in progress at one time for the same bank. However, to ensure correct check numbering, only one check run at a time can be in Printing status for the bank. If you attempt to print checks for a bank while checks are currently being printed for the same bank, a message notifies you that you cannot print until after the current check printing completes.
Fields
Bank Account
The display-only bank account from which funds will be drawn.
Total
The display-only total of the checks to be printed.
Pay Through Date
The display-only most future date for a vendor in the check run.
Check Date
The display-only date that prints on checks.
Accounting Date
This field defaults to the date entered on the checks General Tab. Accept the default date, or enter another accounting date using the format mm/dd/yyyy. Or use the Calendar Button to select a date. This date is the date of record for the check and it is used to determine the period to which the check is posted.
Stub Message
Enter a message of up to 20 characters to print on the check stub, if desired. The message appears on the stub next to the propertycompany name. When reprinting checks, this message can be changed. Once a check run is marked Done, then the message in the Stub Message field is not editable.
Print Proof Listing
Select an option for the Check Proof Listing. Options
include None (does not print
the listing)
The report shows Invoice, Invoice Date, Due Date,
Expense code, P.O. ID, Check Run ID, Outstanding Balance, Amount to Pay,
Status, and Revised Amount. Based on the option selected, the report is
sorted and totaled by
Print Summary Check Register
This option is available for completed Check Runs only. Select this check box to print the Check Register Summary report when you click Print Reports. The Check Register Summary report lists check and deposit ranges, the check type, the number of checks, and the amount paid, grouped by propertycompany and bank. The report also includes a propertycompany total and a grand total.
Print Check Register
This option is available for completed Check Runs only. Use this option to print the Check Register Detail report. From the drop-down list, select the Register Type for the report. Or, if you selected the Print Proof Listing and/or Print Summary Check Register check boxes, but do not want to print the detail report, select None.
Sort By
This field is available only when you have selected the Vendor or By PropertyCompany/Vendor register type from the Print Check Register drop-down list. Select your desired sort order for the report. Options are Vendor Name and Vendor ID.
Password for Signature Font
This field is available only when you have set up password protection for the signature font. For more information, refer to the global policies Check tab.
Cancel
Click to exit without saving changes.
Print Checks
Click to print checks.
Print Reports
Click to print your selected reports (based on your Print Proof Listing and Print Check Register selections).
Print Statements
If you selected the On Statement option for the Overflow field on Check Format Maintenance, the Print Statements button appears once you click Done to acknowledge that checks have printed successfully. Click to print overflow of remittance data on statements. Refer to Check Format Maintenance for additional information.
Procedures
![]() Note
Note
A check run status must be Validated or Approved before you can print it. For instructions for validating or approving a check run, refer to Add Check Run.
Check Runs Grid
![]() Note
Note
If you want to print on legal size forms, you must change the paper size. For instructions, refer to Print Checks on Legal Size Forms, below.
If you see the "Newer Version" pop-up message, you need to install Secure Check Printer software. If there is no pop-up message, skip this step and go to step 4.
When you see the pop-up message:
1. Make note of the instructions in the pop-up message:
 After installing, close the Print Checks page and click Reprint Checks.
2. Click the x to close the Newer Version pop-up message.
3. In the Print Checks form, click the link, Click here to download Secure Check Printer Installer to begin the installation of the Secure Check Printer software.
4. Use your browser’s capabilities to save and then run the Secure Check Printer file.
For installation details,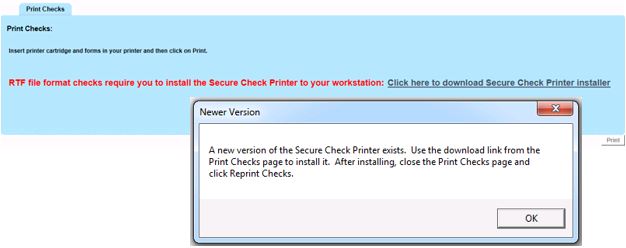
NOTE that the red message and link always appear on the Print Checks form, but the Secure Check Printer software only needs to be installed when you see the "Newer Version" pop-up message. After you have installed the newer software, then disregard the text on the form that instructs you to "Click here to download Secure Check Printer Installer."
Reprint checks - Click this button if the checks contain misprints. NOTE that this button is replaced by a Cancel button after printing the original check run for users who do not have the permission to reprint checks. Refer to Effect of Permissions for more information.
Print check copy - Click this button if the checks printed successfully and you want to print a non-negotiable copy of the checks for your records.
Done - Click this button when the checks have printed successfully and you do not want to print a check copy. The check run no longer appears on the Check Run grid unless you check the Include Completed Check Runs check box.
![]() Notes
Notes
When a user clicks on one of the above options, the option button clicked become disabled so that the user can see which button was selected (this only applies to the first two option buttons). Clicking the Done button, however, triggers the posting process and closes the pop-up window.
Each check copy includes a watermark indicating it is
a non-negotiable copy. Check copies do not include the MICR line.
When you are printing checks with Lien Waivers, a separate window opens showing the Lien Waivers that were created for that check run. From that window, you can change the Lien Waiver Format by clicking in the Lien Waiver Format field and selecting another Format from the drop-down list that opens.
![]() Note
Note
If you are printing checks and advices using multiple banks, the PDF for the next set of checks displays. Return to step 2 and complete the printing process again for this and successive sets of checks and advices. For more information, refer to Printing Checks Using Multiple Banks.
![]() To Print Checks on Legal-Sized
Forms
To Print Checks on Legal-Sized
Forms
To print on legal size check (or advice) forms, you must change the page size of the PDF version of the checks. Prior to being able to do so, you must complete the following actions:
![]() Note
Note
Each check copy includes a watermark indicating it is a non-negotiable copy. Check copies do not include the MICR line.
Users can be granted the permission to reprint checks in the System module.
System—Security—Users—(select user)—Roles—Permissions—eFinancials—Accounts Payable—Check Processing—Reprint Checks.
If a user does not have the permission, after printing checks, the acknowledgment pop-up will provide the option "Cancel" instead of "Reprint Checks."
For additional information about printing from the Check Runs grid, also refer to Require Check Run Approval.
See Also
Copyright © 2018 Infor. All rights reserved. www.infor.com.