Make the following menu selections to display this tab:
eFinancials—Setup—Reports Setup—Report Formats—Details tab
ePO—Setup—Reports—Report Formats—Details tab
Use this tab to add and edit detail information for one section of a report format that can contain many sections.
Section x of x
The number of the section for which you are adding or editing details. For example, if the Sections tab includes 20 section numbers for report segments and you selected the fifteenth section number to edit that report segment, this field would say Section 15 of 20.
Sequence #
The sequence number of the section in the sequence of report segments. You can also think of this number as identifying the detail line.
When you add a new section, the system assigns a sequence # in increments of 10 automatically. You can accept this default or highlight the number and change it.
Type
Select a type for the section you are reformatting from the drop-down list.
Each section of a report is set up with predefined default settings. You can accept that default or select another type. The following types are possible:
1-Print GL Accounts, which includes all general ledger accounts in the report; that is, a detail line.
2-Print description, which includes text data; that is, a header line.
3-Total sections, which includes total from specified sections; that is, a total line.
Include: Debits, Credits, Both
Select an option to specify that reports include Debits Only, Credits Only, or Both (debits and credits). The default is Both.
Additional Fields
Depending on the selections you make on the Details tab, any of the following additional fields can display.
From Account / Through
Enter the starting and ending general ledger account numbers.
A printed copy of the chart of accounts is makes selecting these sequence account numbers easier. Refer to the Chart of Accounts Tab for more information.
Divisor Account
Enter a divisor account number. The divisor account affects percentage calculations in current percentage and year-to-date percentage columns.
Typically, profit and loss amounts display in the percentage columns as a percentage of the divisor amount. For example, a divisor account might represent an income amount such as total sales. While a line item on the financial report might represent expense account like salary expenses. The percentages that appear in the current or year-to-date columns for the line item represent salary expense as a percentage of total sales.
Include Acct Types
All types default as checked. Click an account type box to remove a checkmark if you do not want the account type included on the report. Confirm that you have at least one account type checked or no data prints on the report. The following types are possible: Assets, Liabilities, Capital, Profit, Income, Expenses.
Total from Sequence # / Through Sequence #
Enter the starting and ending sequence numbers for account totaling.
A printed copy of the chart of accounts is makes selecting these sequence account numbers easier. Refer to the Chart of Accounts Tab for more information.
Show or Hide Print Format
Use the Show / Hide Print Format button to display (or hide) print format options.
Show Print Format Button / Hide Print Format Button
Select this button to display (or hide) a list of levels and print attributes. When you select this option, a two-columned sub-pane that includes the following fields opens.
Levels
This list includes all the levels for which you can select formatting options. The currently-selected level appears in a red font. Note that one of your selections is Apply to all Levels. Use caution when selecting this option because of its far-reaching effects.
Different levels can display depending on the Type selected.
For 1-Print GL Accounts, all levels displays.
For 2-Print description, only Apply to all Levels and Heading 1 display.
For 3-Total sections, only Apply to all Levels and Total 1 display.
Print Attributes
Attributes include the options you can apply to a selected level. As you modify print attributes, notice that changes are reflected in the Levels pane giving you a preview of your changes. The print attribute options include the following elements:
Description
Enter the text title for the level. This title prints on the report as a label for data.
For 1-Print GL Accounts, do not enter text in this field. Because the section type is Detail, any text you enter prints for all lines in your report that are detail lines.
For 2-Print description, enter text in this field for a header.
For 3-Total sections, do not enter text in this field. Because the section type is Total, a computed number—a total for the detail sections—displays on the report.
Indent
Enter the number of spaces you want the level to indent. For example, enter 25 to have 25 spaces inserted from the left-margin prior to the any title, total, or data printing. This field can default depending on the line item.
Font Size
Enter the number that corresponds with a font size. For example, 8, 9, or 10 are common font sizes for data while 14, 16, or 18 are common font sizes for titles. This field can default depending on the line item.
Lines Before
Enter the number of empty lines you want inserted before the level-related data, title, or total prints.
Lines After
Enter the number of empty lines you want inserted after the level-related data, title, or total prints.
Overline Char
Select an overline character from the drop-down list. The following overline characters are possible: (none), -, =.
When you select the double line (=), note that while the PDF version always displays the double line, the printed version may not because of the method some print drivers use to handle double lines. The line can appear as a solid bold line on a printed copy.
Bold
Select this option if the level-related title, total, or data should be in bold font. This field can default depending on the line item.
Rev Sign
This field can default as selected depending on the line item. Select this check box if the level-related title, total, or data should be a reverse sign (for example, -1000).
Rev Var Col Sign
This field is cleared by default. Select this check box to print the total with a negative sign (for example, -1000) in the Variance column on the P & L Variance and Departmental P & L Variance reports.
Underline Char
Select an underline character from the drop-down list. The following underline characters are possible: (none), -, =.
When you select the double line (=), note that while the PDF version always displays the double line, the printed version may not because of the method some print drivers use to handle double lines. The line can appear as a solid bold line on a printed copy.
Italics
Select this option if the level-related title, total, or data should be in italic font. This field can default depending on the line item.
Show
Options include Yes (default), No, Sometimes.
Yes (default)
Select this option when the level-related data, title, or total should print on the report.
Use Yes to include groups of accounts in the calculation without printing them on the report. For example, on the Balance Sheet report, you may want to include account balance totals from the P&L accounts but you do not want them to print on the report.
No
Select this option when the level-related data, title, or total should not print on the report.
Sometimes
Select this option when the level-related data, title, or total should print on the report in specific situations. When Sometimes is selected for a section:
Account Type 2 for Header (print descriptions) - The Header will print if the matching total has amounts.
Account Type 3 for Totals - The Total will print if it has amounts.
 NOTES
NOTES
Every header must have a matching total for this to work properly.
The Show zero $ accounts option on the General Tab, overrides the Sometimes option, i.e., the Headers will print for 0.00 accounts even when Show is set to Sometimes.
Cancel
Click to exit without saving changes.
Previous
Click to display the details for the previous sequence number.
Next
Click to display the details for the next sequence number.
Save
Click to save changes.
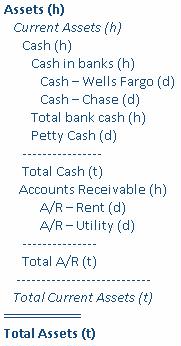
This example shows formatting of the accounts in which the main headers (level 1) are bold, sub-headers (level 2) are indented 3 spaces and italicized, each level of sub-headers (level 3 and beyond) are indented 3 more spaces, sub-sub-totals (level 3) have a single overline, sub-totals have a single overline (level 2) and italics and main totals (level 1) have a double overline and are bold.
Accounts
(h) indicates a header, (t) indicates a total, (d) indicates a detail account:
Assets (h)
Current Assets (h)
Cash (h)
Cash in banks (h)
Cash – Wells Fargo (d)
Cash – Chase (d)
Total bank cash (h)
Petty Cash (d)
Total Cash (t)
Accounts Receivable (h)
A/R – Rent (d)
A/R – Utility (d)
Total A/R (t)
Total Current Assets (t)
Total Assets (t)
Applying this format:
![]() Note
Note
The formatting assumes that headers and totals are in matching pairs (so Assets has a Total Assets, and Current Assets has a Total Current Assets). Levels are determined by how nested the header/total pair are, so the main header/total are level 1, a sub-header/sub-total are level 2, a sub-sub-header/sub-sub-total are level 3, etc. All level 5 and above use the level 5 formatting choices.
See Also
Setup Questions Report Formats Details Tab
Copyright © 2018 Infor. All rights reserved. www.infor.com.